Introduction
I’ve wanted to build myself a CNC router for a long time, at least since high school. Now, more than a decade later, I’m finally getting around to making it a reality.
After weighing a few software options, I ended up choosing LinuxCNC since I already have experience in playing around with Linux and I could get started right away using an old laptop rather than have to buy new hardware. My next choice was the type of hardware to use to interface my laptop with the stepper motors. Typically, a parallel port breakout board or some other kind of breakout board would be used. The laptop I’m using, a ThinkPad X200, is old but nowhere near old enough to have a parallel port and, again, I don’t want to invest too much into new hardware. So, what other interfaces are available? Inspiration struck when saw a This Old Tony video where he talks about upgrading his MAHO milling machine with EtherCAT servomotors. I never used EtherCAT but I had heard of it from doing process control and automation work and was interested in trying it out.
TLDR; LinuxCNC and EtherCAT
Installing LinuxCNC and EtherCAT
On Debian 10.6:
Update apt packages and install upgrades:
~$ sudo apt update && sudo apt upgrade
Install PREEMPT real-time kernel and kernel headers:
~$ sudo apt install linux-image-rt-amd64
~$ sudo apt install linux-headers-rt-amd64
Reboot and select the real-time kernel in GRUB
Remove the original non real-time kernel:
~$ sudo apt remove linux-image-4.19.0-11-amd64
Install git and clone the experimental LinuxCNC repository, ec-debianize repository, and linuxcnc-ethercat repository.
~$ sudo apt install git
~$ git clone https://github.com/LinuxCNC/linuxcnc.git linuxcnc-dev
~$ git clone https://github.com/sittner/ec-debianize.git
~$ git clone https://github.com/sittner/linuxcnc-ethercat.git
- LinuxCNC is LinuxCNC
- ec-debianize is a tool to build EtherCAT master in to a debian package
- linuxcnc-ethercat is the HAL driver which allows LinuxCNC to interact with the EtherCAT master
Install dpkg-dev package
~$ sudo apt-get install dpkg-dev
LinuxCNC
Build and install linuxcnc:
~$ cd linuxcnc-dev/debian
~/linuxcnc-dev/debian$ ./configure uspace
~/linuxcnc-dev/debian$ cd ..
~/linuxcnc-dev$ dpkg-checkbuilddeps
~/linuxcnc-dev$ sudo apt install <all packages listed from above command>
~/linuxcnc-dev$ dpkg-buildpackage -b -uc
~/linuxcnc-dev$ sudo dpkg -i linuxcnc-uspace_2.9.0~pre0_amd64.deb
~/linuxcnc-dev$ sudo apt --fix-broken install
~/linuxcnc-dev$ sudo apt install # all packages listed from above command
I had to add the LinuxCNC repository to apt in order to install python-gtksourceview2:
~/linuxcnc-dev$ sudo apt-key adv --keyserver hkp://keys.gnupg.net --recv-key 3cb9fd148f374fef
~/linuxcnc-dev$ echo deb http://linuxcnc.org/ buster base 2.8-rtpreempt | sudo tee -a /etc/apt/sources.list.d/linuxcnc.list
~/linuxcnc-dev$ sudo apt update
~/linuxcnc-dev$ sudo apt install python-gtksourceview2
Back to installing LinuxCNC
~/linuxcnc-dev$ sudo dpkg -i linuxcnc-uspace-dev_2.9.0~pre0_amd64.deb
~/linuxcnc-dev$ sudo apt --fix-broken install
LinuxCNC is now installed
EtherCAT
~/linuxcnc-dev$ sudo apt install quilt mercurial
~/linuxcnc-dev$ cd
~$ echo $'[extensions]\nmq=' > .hgrc
~/$ cd ec-debianize
~/ec-debianize$ ./get_source.sh
~/ec-debianize$ cd etherlabmaster
~/ec-debianize/etherlabmaster$ dpkg-checkbuilddeps
dkms was missing so it was installed:
~/ec-debianize/etherlabmaster$ sudo apt install dkms
Build the package:
~/ec-debianize/etherlabmaster$ dpkg-buildpackage
If you get a “failed to sign .dsc file” message, it can be ignored. Continue with installation:
~/ec-debianize/etherlabmaster$ cd ..
~/ec-debianize$ sudo dpkg -i etherlabmaster_*_amd64.deb
EtherCAT master and linuxcnc-ethercat is now installed.
EtherCAT Test Configuration
Instead of diving head first and ordering everything up front, I started off with parts for one axis – one closed loop stepper motor (Stepper Online 34HS31-6004D-E1000) and one closed loop EtherCAT stepper driver (Rtelligent ECT60). If I can’t get things to work, I’d rather eat the cost of one stepper and driver instead of 4 of each.
Testing ECT60 in TwinCAT
The consensus on the LinuxCNC forum is that it’s easier to test out EtherCAT devices in TwinCAT instead of fighting with both LinuxCNC configuration and decoding EtherCAT registers at the same time. Not one for unnecessary challenge, I installed TwinCAT and got to work. It’s an add-on to Visual Studio from Beckhoff, the company behind EtherCAT, and free, only requiring registration and renewing every few days.
Setting Up TwinCAT
Get TwinCAT 3 from Beckhoff’s site by downloading their Extended Automation Engineering (XAE) version and install like any other Windows application. If your device isn’t Beckhoff, you’ll likely need to get your device’s description file and copy it to:
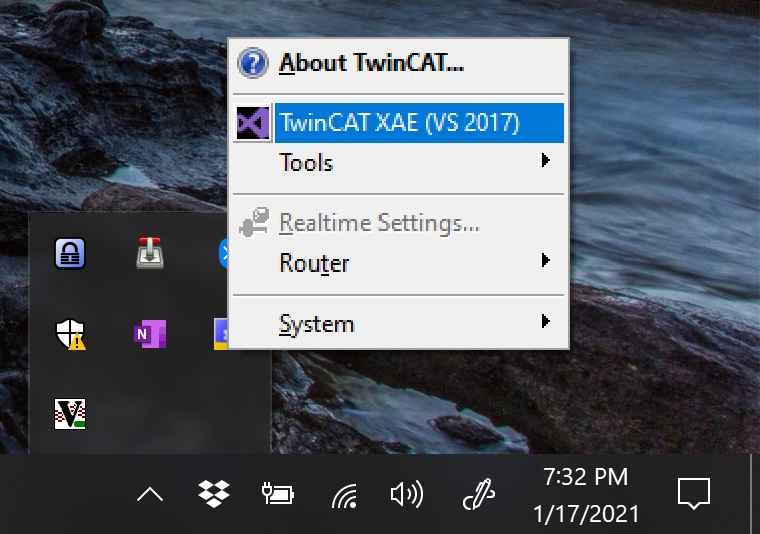
C:\TwinCAT\3.1\Config\Io\EtherCATAfter installation, TwinCAT appears in the system tray. Open up TwinCAT by clicking the tray icon and selecting TwinCAT XAE (VS 2017).
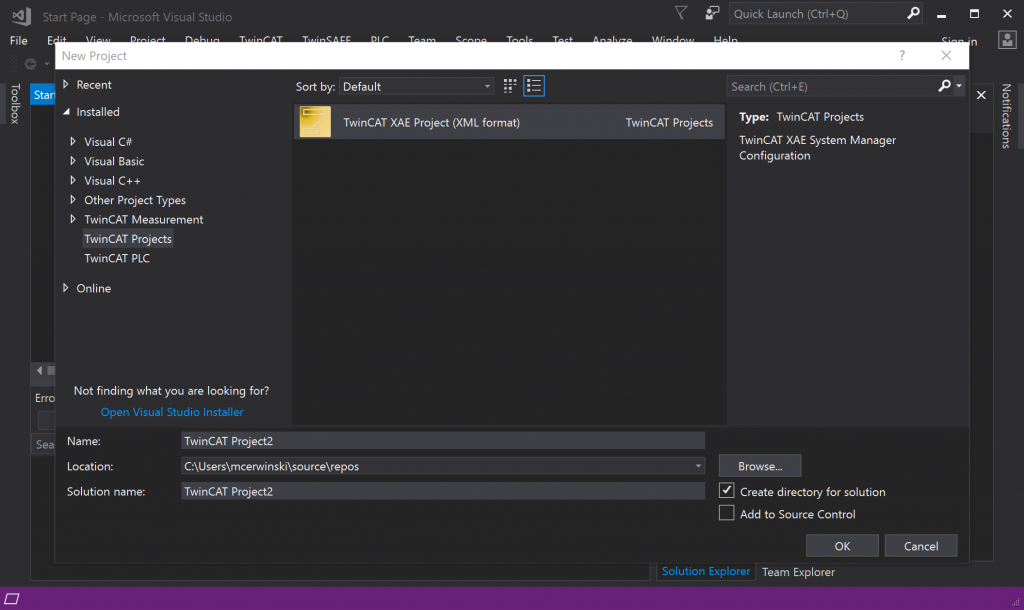
Create a new TwinCAT Visual Studio Project: File > New > Project… > TwinCAT Projects. Give your project and solution a name and pick the location to save it then select OK.
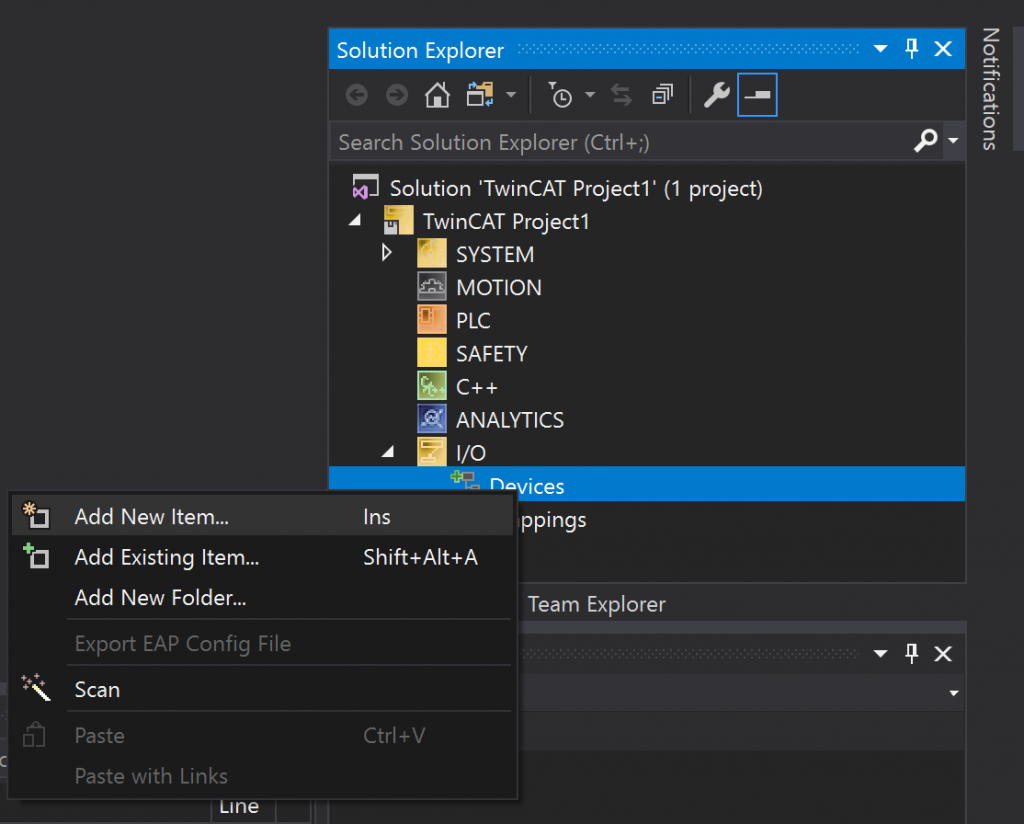
Under the Solution Explorer, expand I/O, right click Devices and select Add New Item…
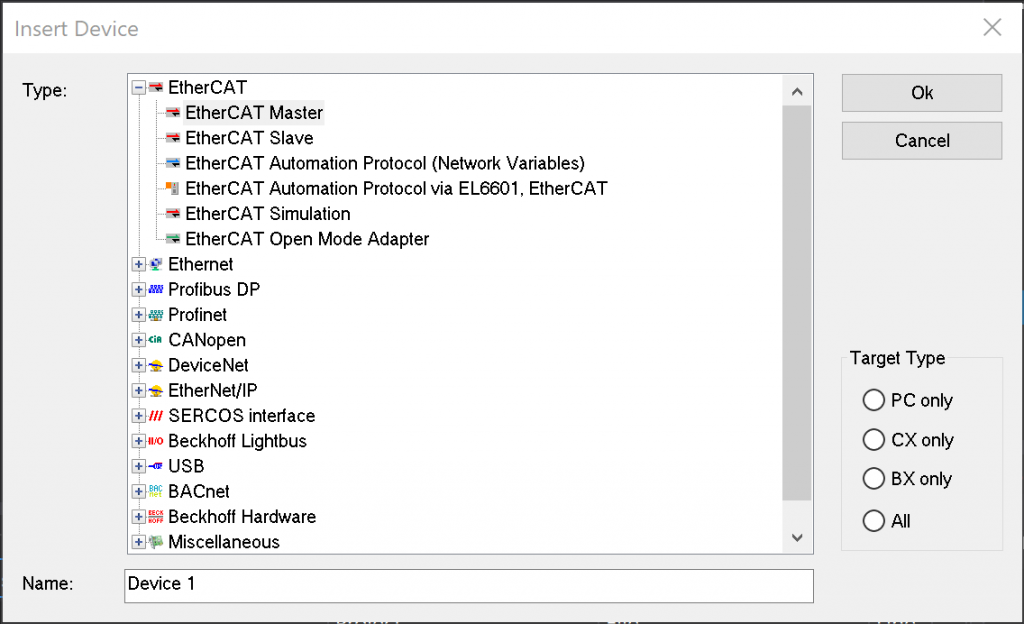
The Insert Device window pops up. Select EtherCAT Master under EtherCAT if it’s not already selected. Then select OK.
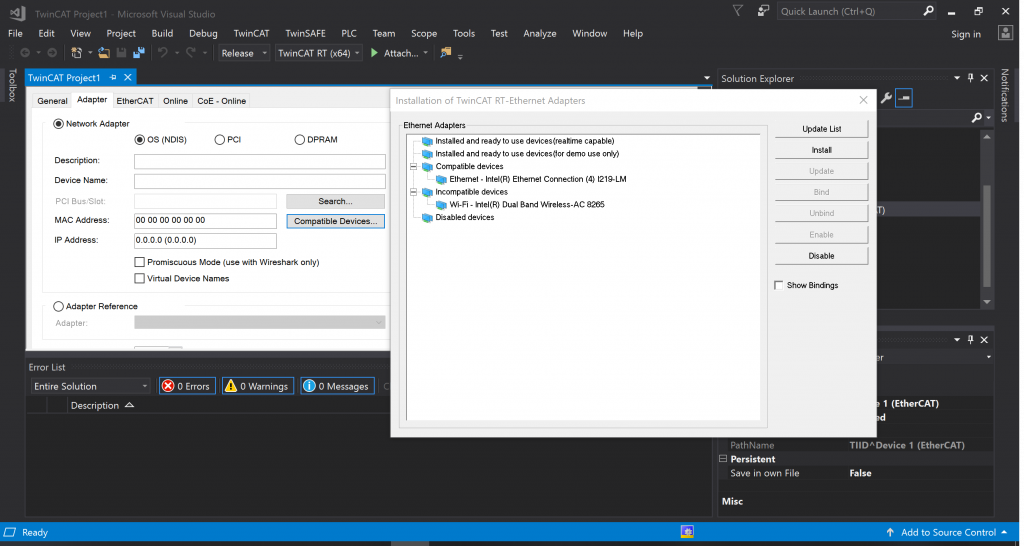
A new item appears under Devices in the Solution Explorer, Device 1 (EtherCAT). Double click Device 1 (EtherCAT), click the Adapter tab then Compatible Devices… . In the Installation of TwinCAT RT-Ethernet Adapters window that pops up, select the Ethernet adapter to be used for EtherCAT communication.
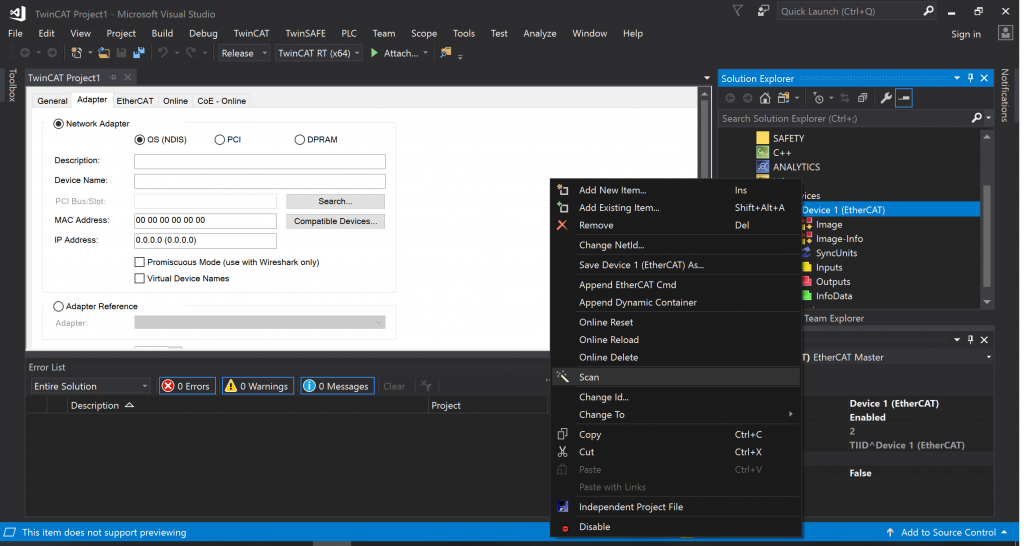
If it’s not already done, connect your EtherCAT device to the Ethernet port of your computer and power your device up. In the Solution Explorer, right click Device 1 (EtherCAT) and select Scan to discover your device.
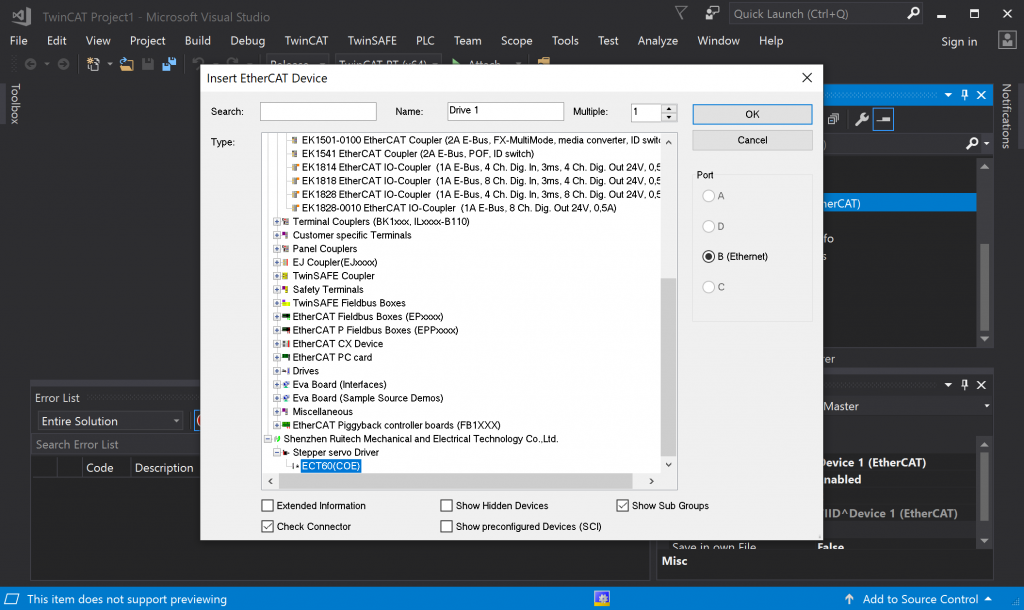
A window titled Insert EtherCAT Device pops up. Select your EtherCAT device and select OK.
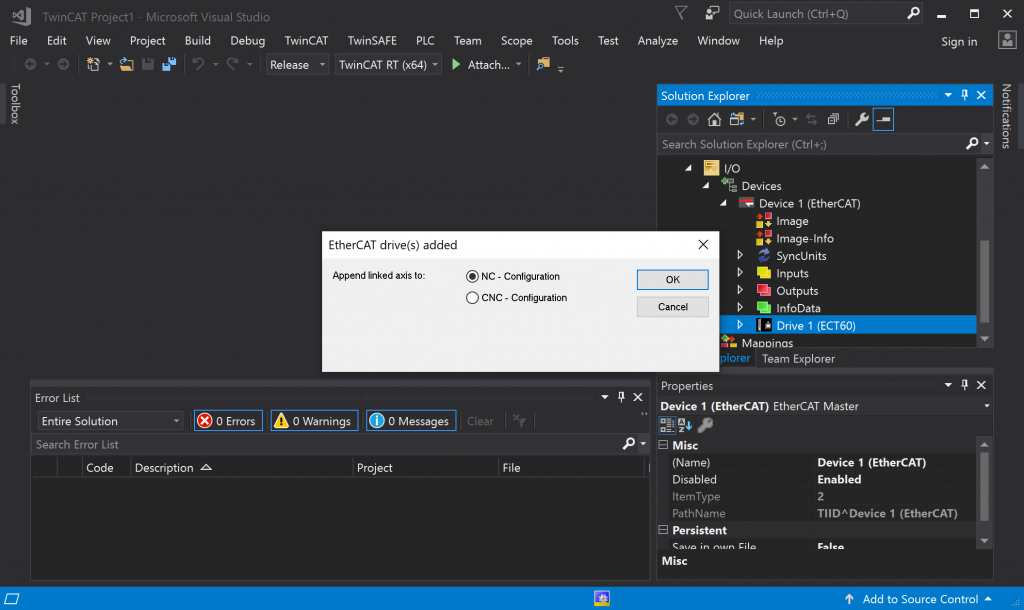
After selecting OK, another window pops up titled EtherCAT drive(s) added. Leave NC checked and select OK.
SET PARAMETERS
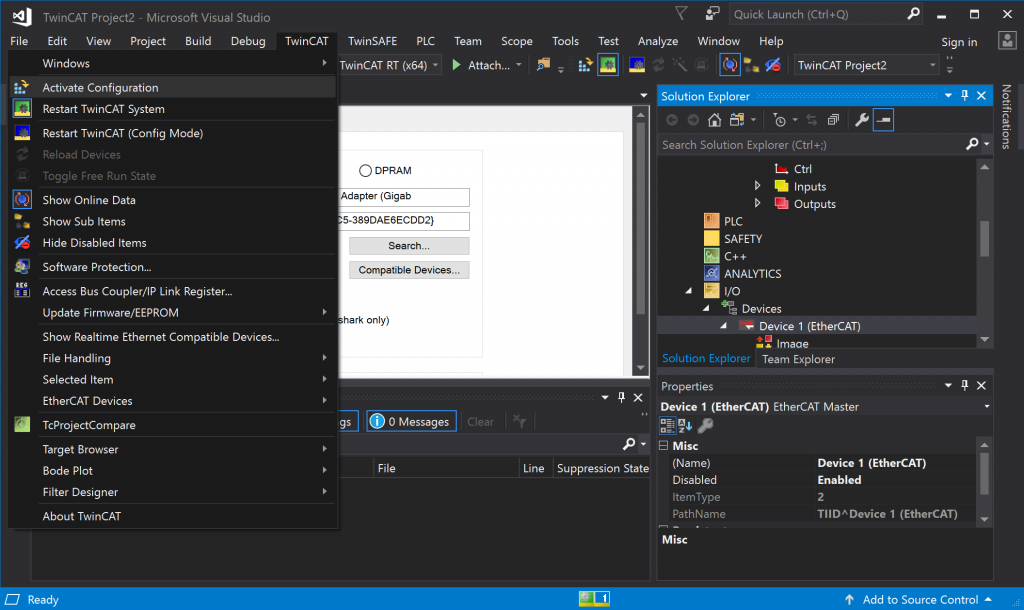
After your parameters are set, restart in run mode by activating the current configuration.
